Behavioral patterns deal with how objects talk to each other. If you’ve ever written a mess of callbacks, observer lists, or state machines held together by duct tape — these patterns give that mess a name and a structure. Here are 9 that I keep reaching for.
1. Chain of Responsibility
Allows us to handle events using one or more Handlers
I think of Chain of Responsibility as a relay race for your requests. You turn event-receiving objects into standalone handler objects, then link them into a chain. When a request comes in, it hops from one handler to the next until somebody picks it up and deals with it. Each handler gets to decide: “I got this” or “pass it along.”
The real win here? It breaks a single bloated request handler into small, focused pieces. If you’ve ever stared at a wall of nested if..else statements and wanted to scream, this pattern is for you. Each handler owns one piece of logic under one specific condition. No more tangled conditionals. And the sender never needs to know which handler will ultimately do the work.
1.1. When to use Chain of Responsibility?
- More than one object can handle the request, but the specific handler depends on context
- When there are multiple ways to handle the same request
- When you don’t want to explicitly specify how an incoming event is handled
- When you want to issue a request to one of many objects without explicitly specifying which one will handle it
- The set of handler objects is independent and can change dynamically
1.2. Structure
Components participating in Chain of Responsibility Pattern:
- Client: Creates handler objects and uses them
- Handler: Interface defining the skeleton for handlers
- BaseHandler: (Optional) The first handler that receives the request. You may skip this class and designate another handler as the first receiver
- ConcreteHandlers: The subsequent handlers
1.3. Implementation
- Declare the Handler skeleton
interface Handler {
    setNext(handler: Handler): void;
    handle(request: Request): any;
}- Create BaseHandler implementing Handler (the first request receiver)
class BaseHandler implements Handler {
    protected next?: Handler;
    init(next?: Handler) {
        this.next = next
    }
    setNext(handler?: Handler) : void {
        this.next = handler
    }
    handle(request: Request) : any {
        if(this.next!=null)
            return this.next.handle(request);
    }
}- Create the structure for subsequent handlers
class ConcreteHandler extends BaseHandler {
    protected next?: Handler;
    init(next?: Handler) {
        this.next = next
    }
    setNext(handler?: Handler) : void {
        this.next = handler
    }
    handle(request: Request) : any {
        if(this.canHandle(request)) {
            // Code here
        } else {
            if(this.next!=null)
                return this.next.handle(request);
        }
    }
    canHandle(request: any) : boolean {
        // return True or False
    }
}- Client creates and uses handlers
class Client {
  sendRequest() {
    let thirdHandler = new ConcreteHandler(null);
    let secondHandler = new ConcreteHandler(thirdHandler);
    let firstHandler = new ConcreteHandler(secondHandler);
    let request = new Request();
    firstHandler.handle(request);
  }
}
2. Command
Command Pattern (also known as Action Pattern or Transaction Pattern) creates an object that can execute a specific method on another input object without needing to know the properties of that input object
2.1. Problem
Say you’re building an e-commerce site. Every week it sends out messages about best-selling products — via email or SMS, depending on what the user chose in their settings. Pick email, no SMS. Pick SMS, no email. So how do you build one object that can push a message through two completely different channels with different logic?
Or picture this: you’re building SlickUI, a GUI framework. You’ve made gorgeous buttons, slick dialogs, beautiful icons. But then it hits you — how do people actually do things with these components? You hope thousands of developers will use SlickUI, spawning millions of SlickButton instances. The obvious answer is inheritance — make a subclass for each button behavior. But a real GUI app might have hundreds of buttons. Hundreds of subclasses? And that’s just buttons — what about menu items, radio buttons? That approach falls apart fast.
2.2. Solution
The answer is to package up the action — what happens when a button gets clicked or a menu item gets selected — into its own object. Pull that handling code out and wrap it in a separate object. These action objects are the commands in Command Pattern.
2.3. When to use Command Pattern?
- When you need to parameterize objects with an action
- When you need to create and execute requests at different times
- When you need to support undo, log, callback, or transaction features
2.4. Structure
Components participating in Command Pattern:
- Command: Interface containing an abstract method to execute an operation. The action is encapsulated as a Command
- ConcreteCommand: Implements Command. We put the action in and encapsulate it as a command. Executed by calling operation() or execute(). Each ConcreteCommand serves a specific action
- Invoker: Manages commands, responsible for executing the given ConcreteCommand. Reduces dependency on any specific ConcreteCommand
- Receiver: The component that actually handles the business logic for the request. In ConcreteCommand’s execute() method, we call the appropriate method in Receiver
- Client: Receives the request from the user, wraps it into the appropriate ConcreteCommand, and sets up its receiver
2.5. Implementation
- Create a request to perform an action on a light bulb from the user
class Light {
    public light: string = "light";
}- Declare the Command interface structure
interface Command {
    execute(): any;
}- Create 2 ConcreteCommands implementing Command, for turning the light on/off
class CommandOn implements Command {
    private object?: Light;
    constructor(object?: Light) {
        this.object = object;
    }
    execute() {
        console.log(this.object?.light + ' on')
    }
}
class CommandOff implements Command {
    private object?: Light;
    constructor(object?: Light) {
        this.object = object;
    }
    execute() {
        console.log(this.object?.light + ' off')
    }
}- Create RemoteControl solely to execute the given ConcreteCommand (to reduce dependency on specific ConcreteCommand objects)
class RemoteControl {
    private command?: Command;
    setCommand(command: Command) {
        this.command = command
    }
    run() {
        this.command?.execute()
    }
}- Client creates RemoteControl, receives the user’s request, sets the corresponding ConcreteCommand, and passes it to RemoteControl for execution
let remote = new RemoteControl();
remote.setCommand(new CommandOn(new Light()));
remote.run(); // light on
3. Mediator
Provides an intermediary class responsible for handling communication between classes
This one uses many-to-many relationships between similar objects to reach a “full object” state. I find Mediator especially useful when components keep stepping on each other’s toes.
3.1. Problem
You want reusable components. Great. But when those components depend on each other, you end up with spaghetti code.
“Spaghetti code” — we’ve all seen it. Complex, tangled control flow full of GOTO statements, exceptions, threads, or other unstructured branching. The name fits: the program flow looks like a bowl of spaghetti, twisted and knotted.
It usually happens when multiple people with different coding styles keep modifying the same codebase over time. Structured programming helps a lot, but sometimes you need a pattern to enforce order.
3.2. Solution
That’s where Mediator comes in. Instead of letting Components talk directly to each other, you route everything through a Mediator object. The Mediator receives events from different Components and handles them. Think of it as a central dispatcher — one place that coordinates all the cross-component chatter.
3.3. When to use Mediator?
- When there are many objects interacting directly with each other. It helps regulate events between objects clearly, eliminating bulky and overlapping source code
- When you want to easily adjust behavior between classes without modifying many classes
3.4. Example
The airport control tower is the classic Mediator example, and I think it nails the concept perfectly. Pilots don’t talk to each other directly — they talk to the tower. The tower decides who takes off, who lands, and in what order. But it doesn’t control entire flights. It only exists to enforce safety during takeoff and landing. That’s exactly what a Mediator does: it coordinates, it doesn’t micromanage.
3.5. Structure
Components participating in Mediator Pattern:
- Components: Objects containing business logic that need to interact with each other during operation
- Mediator: Abstract class declaring methods that allow Components to interact with each other
- ConcreteMediator: The intermediary object implemented from the Mediator interface that enables Components to interact with each other
3.6. Implementation
- Declare the BaseComponent interface with a reference to a ConcreteMediator, then create 2 sample ConcreteComponents with action methods
abstract class BaseComponent {
    protected mediator?: Mediator
    constructor(mediator?: Mediator) {
        this.mediator = mediator
    }
    update(mediator?: Mediator) {
        this.mediator = mediator
    }
}

class Component1 extends BaseComponent {
    constructor(mediator?: Mediator) {
        super(mediator)
    }
    update(mediator?: Mediator) {
        super.update(mediator)
    }
    doA() {
        console.log("Component 1 does A.")
        this.mediator?.notify("A")
    }
    doB() {
        console.log("Component 1 does B.\n")
        this.mediator?.notify("B")
    }
}

class Component2 extends BaseComponent {
    constructor(mediator?: Mediator) {
        super(mediator)
    }
    update(mediator?: Mediator) {
        super.update(mediator)
    }
    doC() {
        console.log("Component 1 does C")
        this.mediator?.notify("C")
    }
    doD() {
        console.log("Component 1 does D")
        this.mediator?.notify("D")
    }
}- Create the Mediator interface with a method to print notifications based on the incoming event sent from ConcreteComponents, and implement a ConcreteMediator
interface Mediator {
    notify(event: String): void
}

class ConcreteMediator implements Mediator {
    constructor(...components: BaseComponent[]) {
        for(let component of components) {
            component.update(this)
        }
    }
    updateMediator(component: BaseComponent) {
        component.update(this)
    }
    notify(event: String) {
        console.log(`Mediator reacts on ${event}`)
    }
}- Using the Mediator Pattern
let component1 = new Component1();
let component2 = new Component2();
let mediator = new ConcreteMediator(component1, component2);

component1.doA();
console.log("\n");
component2.doC();- Result
Component 1 does A.
Mediator reacts on A

Component 1 does C
Mediator reacts on C
4. Memento
Allows us to save and restore the state of an object without revealing its internal details
4.1. When to use Memento Pattern?
I reach for Memento whenever I need save/restore functionality. Think video games — you save your progress, quit, come back later, and pick up where you left off. Or any app that needs Undo/Redo: you snapshot an object’s state, stash it somewhere external, and roll back when needed. It’s also a natural fit for anything that needs transaction management.
4.2. How it works
Memento structures the data you want to save from an Object into a State, then persists that State. The saved States are called Mementos. The CareTaker is responsible for storing States as Mementos and handing them back as States when you need them. Because the object’s internals are stored in State, passing that State around never exposes the object’s implementation details. Clean separation.
4.3. Advantages
- Preserves the encapsulation principle: directly using an object’s state can expose its internal details and violate encapsulation
4.4. Disadvantages
- When a large number of Mementos are created, memory and performance issues may arise
- Hard to guarantee that the internal state of the Memento won’t be modified
4.5. Structure
Components participating in Memento Pattern:
- Originator: The Object whose state is saved or restored
- Memento: The state (State) of the Object while being stored
- CareTaker: Responsible for storing and distributing Mementos. It stores States as Mementos and provides States to Objects when needed
4.6. Example
- Declare the Memento structure
class Memento {
    constructor(private readonly state: string) { }
    getSavedState(): string {
        return this.state
    }
}- Create an Originator class supporting save and restore state from Memento
class Originator {
    private state!: string
    set(state: string): void {
        console.log("Originator: Setting state to " + state)
        this.state = state
    }
    saveToMemento(): Memento {
        console.log("Originator: Saving to Memento.")
        return new Memento(this.state)
    }
    restoreFromMemento(memento: Memento): void {
        this.state = memento.getSavedState()
        console.log("Originator: State after restoring from Memento: " + this.state)
    }
}- Create a CareTaker responsible for storing and retrieving states
 // CareTaker
let savedStates : Array<Memento> = new Array<Memento>()- Client usage
originator.set("State #1");
originator.set("State #2");
savedStates.push(originator.saveToMemento());
originator.set("State #3");
savedStates.push(originator.saveToMemento());
originator.set("State #4");

// Restore the oldest saved state
originator.restoreFromMemento(savedStates[0]);- Result
Originator: Setting state to State #1
Setting state to State #2
Saving to Memento.
Setting state to State #3
Saving to Memento.
Setting state to State #4
State after restoring from Memento: State #2
5. Observer
An object, called the subject, maintains a list of its dependents, called observers, and automatically notifies them of any state changes, usually by calling one of their methods
5.1. Problem
Picture an Excel spreadsheet with multiple worksheets feeding data into charts. You can create as many charts as you want from those worksheets. Now change a value in one worksheet — every chart using that data needs to update. And there’s no limit to how many charts might depend on a single worksheet.
5.2. Solution
Observer Pattern handles this cleanly. The worksheet is the subject, the charts are observers. When worksheet data changes, it notifies all dependent charts automatically. Done.
5.3. When to use Observer Pattern?
- Use a 1-to-many relationship where when one object changes state, all its dependents are automatically notified and updated
- An object can notify an unlimited number of other objects
5.4. Structure
Components participating in Observer Pattern:
- Subject:
- Knows an unlimited list of its observers
- Provides an interface to add and remove observers
- Observer:
- Defines an update interface for objects to be notified by the subject when its state changes
- ConcreteSubject:
- Stores the state and list of ConcreteObservers
- Sends notifications to its observers when state changes
- ConcreteObserver:
- Can maintain a link to a ConcreteSubject object
- Stores the state of the subject
- Implements updates to keep its state consistent with the subject’s notification
5.5. Implementation
- Declare the Observer interface and implement ConcreteObserver
interface Observer {
    update(mesage: string): void
}

class ConcreteObserver implements Observer {
    constructor(private beforeMessage: string) {}
    update(message: string) {
        console.log(this.beforeMessage + " " + message)
    }
}- Create the Subject interface and implement ConcreteSubject with the ability to notify ConcreteObservers on changes
interface Subject {
    observers : Array<Observer>
    attach(observer: Observer) : void
    detach(observer: Observer): void
    notifyChange(message: string): void
}
class ConcreteSubject implements Subject {
    observers: Array<Observer> = new Array<Observer>()
    attach(observer: Observer): void {
        this.observers.push(observer)
    }
    detach(observer: Observer): void {
        this.observers.splice(this.observers.indexOf(observer), 1)
    }
    notifyChange(message: string): void {
        for (let observer of this.observers) {
            observer.update(message)
        }
    }
}- Usage
let subject : Subject = new ConcreteSubject()
let observer1 : Observer = new ConcreteObserver("Message 1 updated:")
let observer2 : Observer = new ConcreteObserver("Message 2 updated:")
subject.attach(observer1)
subject.attach(observer2)

subject.notifyChange('Subject notify!')
subject.detach(observer1)
console.log("Removed Observer 1\n")
subject.notifyChange('Subject notify!')- Result
Message 1 updated: Subject notify!
Message 2 updated: Subject notify!
Removed Observer 1
Message 2 updated: Subject notify!
6. Strategy
Allows us to define business logic as different objects that can be swapped at runtime
6.1. When to use Strategy Pattern?
This is one of my most-used patterns. Reach for it whenever you have two or more behaviors that need to be interchangeable at runtime. Instead of hard-coding which algorithm runs, you let the caller decide by injecting the right strategy.
6.2. Structure
Components participating in Strategy Pattern:
- Object using Strategy: The object that uses Concrete Strategies. It contains a reference with a data type of Strategy Protocol
- Strategy Protocol: Defines the properties and methods that all Concrete Strategies must have and implement
- Concrete Strategy: Classes implementing the Strategy Protocol. They contain the specific business logic of each class
6.3. Implementation
- Declare the Strategy interface and implement 3 ConcreteStrategies performing 3 different operations
interface Strategy {
    doOperation(num1: number, num2: number): number
}
class OperationAdd implements Strategy {
    doOperation(num1: number, num2: number): number {
        return num1 + num2
    }
}
class OperationSubstract implements Strategy {
    doOperation(num1: number, num2: number) : number {
        return num1 - num2
    }
}
class OperationMultiply implements Strategy {
    doOperation(num1: number, num2: number) : number {
        return num1 * num2
    }
}- Create a Context class with a reference to the corresponding ConcreteStrategy depending on context, and use that Strategy
class Context {
    constructor(private strategy: Strategy) { }
    executeStrategy(num1: number, num2: number) : number {
        return this.strategy.doOperation(num1, num2)
    }
}- Usage
let context : Context = new Context(new OperationAdd())
console.log("10 + 5 = " + context.executeStrategy(10, 5))

context = new Context(new OperationSubstract())
console.log("10 - 5 = " + context.executeStrategy(10, 5))

context = new Context(new OperationMultiply())
console.log("10 * 5 = " + context.executeStrategy(10, 5))- Result
10 + 5 = 15
10 - 5 = 5
10 * 5 = 50
7. Visitor
Allows changing and extending operations on an object without modifying its internal structure or content
Here’s the idea: objects (Elements) pull their operations out into separate methods defined on dedicated Visitor classes. This decouples the operations from the object’s structure, making changes way more flexible.
Every time you add a new operation, you create a new visitor class. That’s it — the original objects stay untouched.
There’s also a neat side benefit: Visitor recovers type information that would otherwise be lost from passed arguments. It dispatches the right method based on the types of both the calling object and the argument. This is called Double Dispatch.
7.1. What are Double Dispatch and Single Dispatch?
- Single Dispatch: The method called is determined only by the data type of the calling object
class TestClass {
    testMethod(param: string) {
        console.log(param)
    }
}
new TestClass().testMethod("Hello World")- Double Dispatch: The method called is determined by the data type of both the calling object and the input object. This is the technique that Visitor Pattern uses, which is why it’s also called Double Dispatch
class Visitor {
    visit(element: Element) {
        console.log(element.hello())
    }
}
class Element {
    hello() {
        return "Xin chào"
    }
    accept(Visitor: visitor) {
        visitor.visit(this)
    }
}
new Element().accept(new Visitor())
7.2. Advantages
- Allows one or more behaviors to be applied to a set of objects at run-time, decoupling behaviors from object structure
- Ensures the Open/Closed Principle: the original object is not modified; new behaviors can easily be added through visitors
7.3. When to use Visitor Pattern?
- When there is a complex object structure with many classes and interfaces. Users need to perform specific behaviors unique to each object, depending on their concrete class
- When we want to move behavioral logic from objects to another class for processing to reduce complexity
- When the data structure of objects rarely changes but their behaviors change frequently
- When you want to avoid using the
instanceofoperator
7.4. Structure
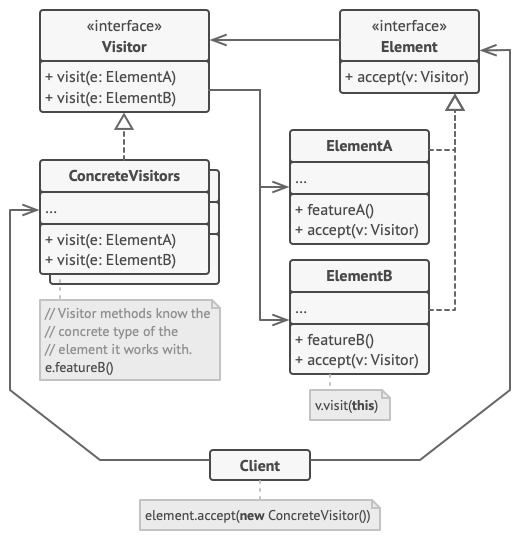
Components participating in Visitor Pattern:
- Element: Interface declaring the skeleton for data-processing objects. Must declare an
accept()method to receive incoming operations - ConcreteElement: Data-processing object implementing Element
- Visitor: Interface declaring the skeleton for visitors that help define and inject alternative operations into ConcreteElements
- ConcreteVisitor: Class that invokes alternative operations on ConcreteElements, implemented from Visitor
7.5. Example
I like this example because it’s silly but it gets the point across. You’re a ladykiller. You want to confess your love to a girl, but you don’t know her nationality. Obviously you can’t say “anh yeu em” to a Japanese girl — she won’t understand. You’d say “Aishite imasu” instead. So we write a shared function sayLove() that picks the right words based on each lady’s nationality.
interface Lady {
    sayLove(): void;
}

class AmericanLady implements Lady {
    sayLove(): void {
        console.log("I love you");
    }
}

class JapanLady implements Lady {
    sayLove(): void {
        console.log("Aishite imasu");
    }
}

let lady : Lady = new JapanLady();
lady.sayLove(); // Result: Aishite imasu
Now here’s where it gets annoying. Want to add sayGoodBye()? You’d have to add it to the Lady interface, then implement it in every single class that extends it. Time-consuming and risky. This is exactly where Visitor Pattern shines.
- First, refactor the
Ladyinterface and re-implementJapanLadyandAmericanLadywith only theaccept()method. Move the actual logic intoConcreteVisitor
interface Lady {
    accept(visitor: Visitor): void
}

class AmericanLady implements Lady {
    accept(visitor: Visitor): void {
        visitor.visit(this)
    }
}

class JapanLady implements Lady {
    accept(visitor: Visitor): void {
        visitor.visit(this)
    }
}- Declare the
Visitorinterface skeleton and implementSayLoveVisitorthat prints love words to each lady (since JavaScript doesn’t support polymorphism without inheritance, we temporarily useinstanceofas a substitute)
interface Visitor {
    visit(lady: Lady): void
}

class SayLoveVisitor implements Visitor {
    visit(lady: Lady): void {
        if (lady instanceof AmericanLady)
            console.log('I love you')
        if (lady instanceof JapanLady)
            console.log('Aishite imasu')
    }
}- Test run
let lady: Lady = new AmericaLady()
lady.accept(new SayLoveVisitor()) // Result: I love you- Later, you’re done and want to
SayGoodByeto this lady and move on. Just create another ConcreteVisitor
class SayGoodByeVisitor implements Visitor {
    visit(lady: Lady): void {
        if (lady instanceof AmericanLady)
            console.log('Good bye!')
        if (lady instanceof JapanLady)
            console.log('Sayounara!')
    }
}- Let’s test it
let lady: Lady = new JapanLady()
lady.accept(new SayGoodByeVisitor()) // Result: Sayounara!
7.6. Conclusion
When you want to extend a ConcreteElement’s operations, you only update the Visitor — the ConcreteElement stays untouched. Open/Closed Principle satisfied.
The biggest downside? Visitor doesn’t handle extending Elements well. Adding a new Element means updating every single Visitor interface and class. That said, you can work around this with careful pattern adjustments and some clever data structure tweaks.
8. State
Allows an object to change its behavior when its internal state changes at runtime
8.1. Advantages
- Objects change state clearly
- States of objects can be shared with each other
- Ensures the Single Responsibility Principle (SRP): separates each State into its own class
- Ensures the Open/Closed Principle (OCP): we can add new States without affecting other States or the existing Context
- Keeps specific behavior corresponding to each state
8.2. When to use State Pattern?
I see State Pattern a lot in systems that cycle through multiple states during their lifecycle. The number of states can be fixed or open-ended. Traffic lights are the textbook example: “red,” “yellow,” “green” — constantly rotating. It’s also a great cure for deeply nested if-else chains that try to manage state transitions manually.
8.3. Structure
Components participating in State Pattern:
- Context: The object that contains the changing state or behavior
- State: Interface used to list and declare necessary properties and functions of a State. This allows us to determine the attributes and functions required in ConcreteStates
- ConcreteState: Implements State, stores Context’s state. There can be multiple ConcreteStates, each representing a state of the Context
8.4. How it works
- In State Pattern, Context is initialized with its default state
- Each time the Context’s state changes, it saves the new state replacing the old one; simultaneously it processes actions according to its new state. This means the Context’s behavior changes depending on its state
8.5. Workflow
- Context defines behaviors that can communicate with the Client, so the client requests behaviors through the Context
- Context contains an instance of State; the initial State can be set from the Client, but once set the Client cannot modify it
- Context can send itself as an argument to State, so State can access Context to change state if necessary
- When Context performs a behavior, it calls the current State to execute that behavior; after execution, State may change Context’s state if needed
8.6. Example
We define a State interface with 2 concrete states: LowerCaseState and MultipleUpperCaseState. One prints lowercase, the other uppercase. They swap back and forth automatically.
interface State {
    writeName(context: StateContext, name: string): void;
}

class LowerCaseState implements State {
    writeName(context: StateContext, name: string) {
        console.log(name.toLowerCase());
        context.setState(new MultipleUpperCaseState());
    }
}

class MultipleUpperCaseState implements State {
    private count: number = 0;
    writeName(context: StateContext, name: string): void {
        console.log(name.toUpperCase());
        /* Change state after StateMultipleUpperCase's writeName() gets invoked twice */
        if (++this.count > 1) {
            context.setState(new LowerCaseState());
        }
    }
}
The Context class holds a state variable — the current state. It gets a default state on construction. There’s also a setter to swap states whenever a behavior is performed. The behavior here is writeName().
class StateContext {
    private state!: State;
    constructor() {
        this.state = new LowerCaseState();
    }
    setState(newState: State): void {
        this.state = newState;
    }
    writeName(name: string): void {
        this.state.writeName(this, name);
    }
}
Usage
monday
TUESDAY
WEDNESDAY
thursday
FRIDAY
SATURDAY
sunday
8.7. Related Design Patterns
- Flyweight Pattern: One result of State Pattern is that object states can be shared. Flyweight Pattern specifies when and how to share those states
- Singleton Pattern: Typically, State objects are designed as Singletons because we only need a single instance of each state
- Strategy Pattern: In State Pattern, concrete states are linked to each other through internal method implementations, allowing states to automatically switch during runtime. Strategy Pattern doesn’t care about other states and only receives the state provided by the Client
9. Repository
Repository Pattern is an intermediary layer between data access and logic processing, making data access more secure and structured
9.1. Structure
Repository Pattern sits between your Data Access and Business Logic layers. It makes data access cleaner and more maintainable.
Without it, you’d just write a Controller that queries the database directly. With Repository Pattern, you put a Repository between Controller and Model. The flow is simple: request hits Controller, Controller calls Repository, Repository calls Model to fetch and process data. The Controller never touches the database directly.
9.2. Advantages
- Easier to maintain and extend code
- Increased security and clarity in code
- Fewer errors
- Avoids code duplication
9.3. Example
getPost() {
    let posts = Post.orderBy('id', 'desc').get();
    return posts;
}
Simple enough. But what happens when the client wants posts sorted alphabetically? You dig into the function and rewrite it. Table structure changes? You’re forced to update getPost() along with a hundred other methods. Worst case, management wants a different database entirely and you’re rewriting everything. Repository Pattern saves you from all of that.
You create a PostRepository class, maybe in a separate Repositories directory. All your data-fetching logic lives there. When requirements change, you update one file.
class PostRepository {
  getPostById() {
    return Post.orderBy("id", "desc").get();
  }
}
Now your PostController just calls the repository:
import { PostRepository } from './../Repositories';
class PostController extends Controller {
    constructor(private postRepository: PostRepository) { }
    getPost() {
        let posts = this.postRepository.getPostById();
        return posts;
    }
}